Garden tools are awkward to pack at the best of times. Long handles stick out, blades are sharp, and everything seems to be covered in dried soil the moment you try to wrap it. If you just throw them in a van and hope for the best, you’ll likely arrive at your new home with rust spots, damaged boxes, and something poking through the wrapping that shouldn’t be.
The good news is it’s not complicated. You just need to know the right order to do things in — and that’s exactly what this guide covers.
TL;DR
- Clean every tool and let it dry completely before you wrap anything.
- Wrap sharp and blade ends individually before bundling or boxing.
- Bundle long-handled tools together and secure them at multiple points.
- Use double-walled boxes for heavy or sharp hand tools, with padding to stop movement.
- Disassemble larger equipment and drain petrol from fuel-powered tools before packing.
- Label every box clearly on the side with contents and handling notes.
- Keep an inventory so you know what’s where when you arrive.
Table of Contents
How Do You Pack Garden Tools for Moving?
Clean every tool, sort by size and type, wrap sharp ends individually, bundle long-handled tools together, box smaller items with enough padding to prevent movement, seal and label every box clearly, and keep an inventory. That’s the full process — each step is covered in detail below.
Before anything gets wrapped or boxed, give everything a proper clean. Soil left on tools during transit holds moisture, and moisture leads to rust. It can also contaminate other items in the same box. Use a stiff brush to scrub off dried dirt, rinse metal parts with water, and let everything dry completely before you start wrapping. Damp tools sealed in bubble wrap are a reliable way to end up with rust spots.
Once everything’s clean, sort your tools into groups. Long-handled tools like spades, forks, rakes, and hoes belong together. Hand tools like trowels, secateurs, and weeders form a separate group. Larger equipment, such as lawnmowers and hedge trimmers, needs its own approach entirely.
For long-handled tools, bundling is the most practical method. Lay them out with the handles running in the same direction, wrap each blade end individually using bubble wrap or an old cloth, then secure the bundle with strong tape or bungee cords at two or three points. Don’t leave any metal ends exposed. A sharp corner catching something in transit can cause real damage to nearby items and is a risk to whoever’s doing the unloading.
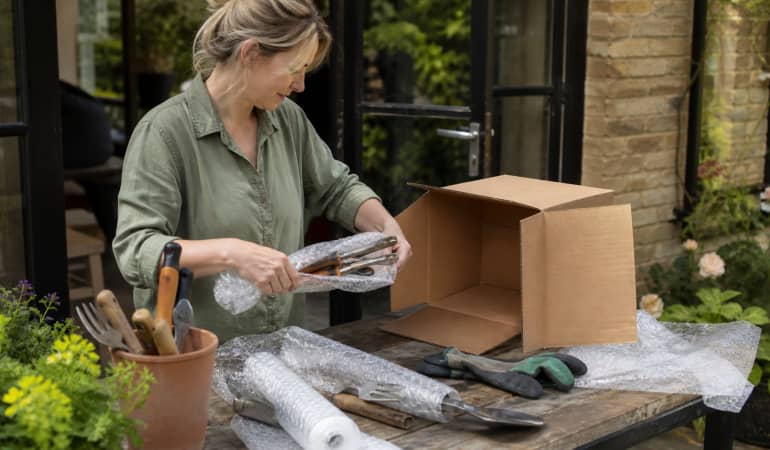
Smaller hand tools go into boxes, but not loose. Wrap each one individually, or at minimum wrap the working end, then fill gaps with crumpled paper or old cloth to stop them shifting. A trowel rattling around in a half-empty box will come out looking worse than it went in.
For larger equipment, disassembly is usually the right call. Remove detachable handles where possible, drain petrol from fuel-powered tools before packing (this isn’t optional — it’s a safety requirement), and wrap parts separately. It saves space, reduces damage risk, and makes loading considerably easier.
Check also:
Step-by-Step: Packing Garden Tools for Moving
Follow these steps to pack garden tools safely and efficiently for your move.
Sort Tools by Type and Size
Lay everything out and group it. Long-handled tools in one pile, hand tools in another, power equipment to one side. This makes the next steps much faster and helps you figure out what boxes and materials you’ll need before you start wrapping anything.
Clean Every Tool Thoroughly
Scrub off dried soil with a stiff brush, rinse metal parts, and leave everything to dry completely. Don’t skip the drying step. Wrapping damp tools traps moisture against the metal, and rust can set in surprisingly quickly, even over a short move.
Wrap Sharp and Blade Ends Individually
Use bubble wrap or thick cloth to wrap the working ends of each tool before anything else. Secure the wrapping with tape so it doesn’t shift in transit. This protects other items in the box and protects anyone doing the unloading.
Bundle Long-Handled Tools Together
Line up spades, forks, rakes, and hoes with handles running the same direction. Once the blade ends are wrapped, bind the bundle securely with strong tape or bungee cords at two or three points along the length. They’re easier to carry and load this way, and nothing gets separated.
Pack Smaller Tools into Boxes with Padding
Place hand tools into double-walled boxes, wrapping each one or at minimum the working end. Fill any gaps with crumpled paper, old cloth, or additional bubble wrap to stop movement. A box where tools can rattle around is a box where tools will get damaged.
Disassemble Larger Equipment and Drain Fuel
Remove detachable handles and break down power equipment where possible. Drain petrol completely from any fuel-powered tools before packing. Wrap parts separately and keep screws or fittings in a clearly labelled bag taped to the relevant part.
Seal and Label Every Box
Tape every box securely along the top and bottom seams. Write the contents clearly on the side using a thick marker. Add handling notes where needed, such as ‘Heavy’ or ‘Sharp Blades Inside’. Clear labelling means faster, safer unpacking at the other end.
Create an Inventory Checklist
Write down every tool you’ve packed and note which box it’s in. Keep this list somewhere accessible, not buried in a box. You’ll thank yourself when you’re looking for the trowel on your first day in the new garden.
Need help getting your garden tools packed before moving day?
Let's Get in TouchFor questions about the services we offer visit our main site or you can always call us at 020 3746 0584
Why Should You Create a Garden Tools Inventory Before Packing?
An inventory tells you exactly what you own, where you’ve packed it, and what should be waiting at the other end. It takes about twenty minutes to put together and saves hours of frustrated searching when you’re trying to get the garden sorted after moving in.
It sounds like something only very organised people bother with. But it’s just practical. Garden tools scatter easily during a move. A trowel ends up in a box with the potting compost. Secateurs go in with string and gloves. By the time you arrive, you’ve no idea which box anything is in.
A simple handwritten list works fine. Note each tool, which box it’s packed in, and the condition it was in when it went in. If you’ve got a lot of equipment, grouping the list by category- long-handled tools, hand tools, and power equipment- makes it much easier to scan quickly.
There’s also a practical benefit if something goes wrong. If anything gets damaged or goes missing during the move, an inventory gives you a clear record of what you had and what state it was in. That’s useful if you need to make a claim against a removal company’s liability cover.
Check also:
How Should You Seal and Label Boxes of Garden Tools?
Seal every box with strong tape along the top and bottom seams — at least two strips each. Don’t just fold the flaps over each other. Heavy tools will push through unsealed cardboard without much effort, especially once a van starts moving.
Labelling is where people rush, and it costs them time at the other end. Write the contents on the side of the box, not just the top. When boxes are stacked in the van or in a hallway, only the sides are visible. Include a handling note if contents are sharp or heavy. Something like “Heavy: Garden Tools” or “Sharp Blades Inside — Handle with Care” is clear enough to make anyone think twice before tossing the box into a corner.
Use a thick marker and write large. A tiny label written in pencil on a beige box disappears completely when you’re surrounded by forty other boxes in a new hallway. Bold, clear, on the side of the box, every time.
If you’d rather leave this to someone else, a packing service handles all the wrapping, sealing, and labelling for you. It’s worth telling them upfront if you have anything unusually large, sharp, or heavy in your garden collection so they can plan accordingly.
Garden Tools Packing Checklist
Use this before you seal everything up and load the van. If you can tick every item, you’re ready.
- All tools cleaned and fully dried before wrapping.
- Sharp and blade ends wrapped individually with bubble wrap or thick cloth.
- Long-handled tools bundled together and secured at multiple points.
- Hand tools boxed with adequate padding to prevent movement.
- Larger equipment disassembled where possible.
- Petrol drained from all fuel-powered tools.
- All boxes sealed with strong tape along top and bottom seams.
- Every box labelled clearly on the side with contents and handling notes.
- Inventory checklist completed and kept somewhere accessible, not in a box.
Check also:
Frequently Asked Questions
Do garden tools need to be disassembled before moving?
Not everything needs disassembly, but it’s worth doing for anything bulky or awkward. Detachable handles on spades or forks can be removed to save space. Power equipment should be broken down where possible. Always drain petrol from fuel-powered tools before packing — this is a safety requirement, not just a space-saving measure. Keep any screws or fittings in a labelled bag taped to the relevant part.
Can garden tools go in a standard removal van?
Yes, without any issue. The key is packing them so they don’t shift or damage other items during the journey. Sharp ends must be covered, bundles must be secured, and boxes must be properly sealed. Loose tools sliding around inside a van can cause injury during unloading and damage anything they make contact with along the way.
What should I do if my garden tools are rusty before the move?
Deal with the rust before you pack, not after. Use wire wool or a rust remover to clean the affected areas, then apply a thin coat of oil to the metal. Wrap treated tools carefully so the oil doesn’t transfer to other items. Packing rusty tools as-is risks spreading rust to surrounding materials and makes the problem worse during transit.
Is it safe to pack sharp tools in the same box as other items?
It’s possible but needs care. Wrap blade ends with several layers of bubble wrap and secure the wrapping with tape so it can’t come loose in transit. Position sharp items to one side of the box rather than mixing them throughout. Never pack sharp tools in soft bags or lightweight boxes without reinforcement. If you’re not confident the wrapping will hold, give sharp tools their own dedicated box.
How far in advance should I start packing garden tools?
Start one to two weeks before moving day. Pack seasonal or rarely-used equipment first, since you won’t need it before the move. Keep out only what you’re actively using in the garden and pack those items last, ideally one to two days before. This avoids a last-minute scramble and means nothing essential gets buried too early.
Get your garden tools packed safely and ready to move.
Enter your postcode to view our rates and availability in your area.
For questions about the services we offer visit our main site or you can always call us at 020 3746 0584
Conclusion
Packing garden tools for moving isn’t complicated, but it does need a proper approach. Sort, clean, wrap, bundle, box, seal, label, and list. Follow those steps and everything arrives in the same condition it left. Skip them and you’re dealing with rust, damaged boxes, and something sharp that’s worked its way through the wrapping.
The garden is usually one of the last things people think about when planning a move and one of the first things they want to enjoy when they arrive. Getting the tools there safely means you can get straight to it.
How helpful is this article?

 Loading...